Skip to content
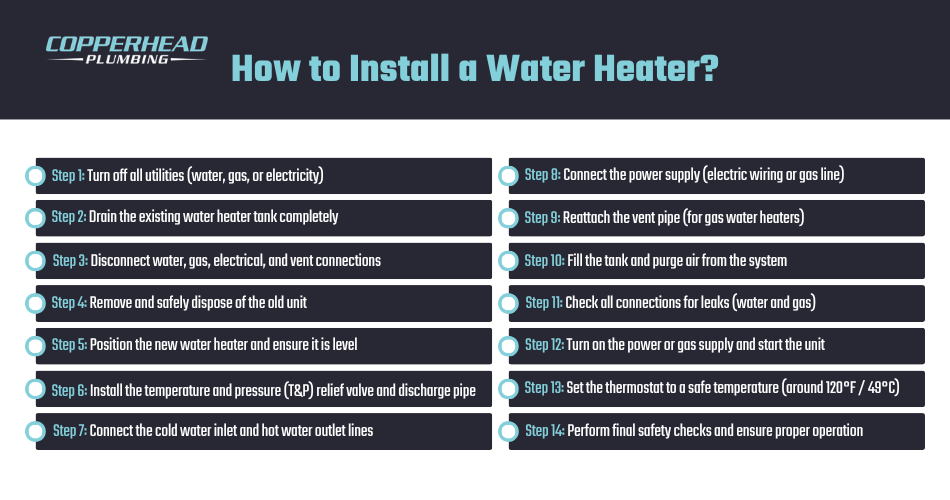
Installing a water heater involves turning off utilities, removing the old unit, positioning the new heater, connecting water lines and power or gas supply, and testing the system for leaks and proper operation. This structured process ensures safe handling of the cold water supply, correct installation of the temperature and pressure relief valve, and secure connections that prevent water damage and support long-term performance.
The installation process requires evaluating key considerations such as heater type, tank capacity, fuel source, and energy efficiency, followed by gathering the necessary tools and materials and preparing the site to meet safety and code requirements. It then progresses through critical steps, including proper drainage, secure mounting, correct venting or electrical wiring, and thorough system testing to confirm that the unit is code-compliant and delivers consistent, reliable hot water.
Follow this 14-step process to install a water heater:
- Step 1: Turn off all utilities (water, gas, or electricity)
- Step 2: Drain the existing water heater tank completely
- Step 3: Disconnect water, gas, electrical, and vent connections
- Step 4: Remove and safely dispose of the old unit
- Step 5: Position the new water heater and ensure it is level
- Step 6: Install the temperature and pressure (T&P) relief valve and discharge pipe
- Step 7: Connect the cold water inlet and hot water outlet lines
- Step 8: Connect the power supply (electric wiring or gas line)
- Step 9: Reattach the vent pipe (for gas water heaters)
- Step 10: Fill the tank and purge air from the system
- Step 11: Check all connections for leaks (water and gas)
- Step 12: Turn on the power or gas supply and start the unit
- Step 13: Set the thermostat to a safe temperature (around 120°F / 49°C)
- Step 14: Perform final safety checks and ensure proper operation
What Is the Step-by-Step Process to Install a Water Heater?
Water heater installation involves turning off utilities, draining and removing the old unit, positioning and securing the new water heater, connecting water, gas, or electrical lines, and testing the system for leaks and proper operation. Each step ensures correct pipe alignment, secure fittings, proper venting or wiring, a calibrated pressure-relief function, and a safe startup without leaks, pressure issues, or performance faults.
Step 1: Turn off all utilities (water, gas, or electricity)
First, turn off all utilities by shutting off the cold water supply valve, switching off the circuit breaker for the electric water heater, or closing the gas supply valve for the gas unit. This isolates the system from active water flow, power, or gas, reducing the risk of electrical shock, leaks, or uncontrolled discharge during installation. After that, close the cold water inlet valve and confirm the flow has stopped by opening a nearby hot water tap. For electric units, switch off the dedicated breaker and confirm power is off with a non-contact voltage tester, while for gas systems, turn the control valve to the off position and ensure the line is fully shut off for a safe, code-compliant setup.
Step 2: Drain the existing water heater tank completely
After turning off all utilities, you must drain the water heater tank completely before disconnecting the unit, as any remaining water can cause spills and water damage during removal. Attach a garden hose to the drain valve at the bottom of the tank and direct it to a suitable drainage point. Open a nearby hot-water faucet to release pressure in the system, then open the drain valve and allow the tank to empty. This process also flushes out accumulated sediment, leaving the unit clean and ready for safe disconnection. Once fully drained, the water supply line and pipe fittings can be safely detached without risk of spillage.
Step 3: Disconnect water, gas, electrical, and vent connections
Once the tank is completely drained, disconnect the water supply line, gas line, or electrical wiring, and vent pipe to fully separate the old water heater from the home system, ensuring all connections are safely isolated and ready for removal. Use a pipe wrench to loosen the cold-water inlet and hot-water outlet while controlling any remaining drips. Then, for gas units, detach the gas line and remove the vent pipe with proper support. For electric systems, disconnect the wiring from the junction box after verifying that the power is off, keeping all components secure and safely isolated.
Step 4: Remove and safely dispose of the old unit
If the water heater is wall-mounted, begin by loosening and removing the mounting brackets or hardware, while for a floor-mounted unit, locate and remove any anchor bolts or securing brackets holding it in place before proceeding with removal. Once freed, detach the tank carefully and use an appliance dolly or hand truck to move it, keeping it upright to prevent spills from residual water or sediment. Ensure all connections are fully disconnected, clear a safe path from the installation area, and transport the unit steadily to avoid strain or tipping. Dispose of the old heater according to local codes to ensure a safe, compliant water heater installation.
Step 5: Position the new water heater and ensure it is level
Place the new water heater at the installation site on a stable, level surface, ideally within a drain pan, ensuring adequate clearance for maintenance and proper airflow where required. Use a level to check alignment on all sides and adjust the base or supports to achieve a balanced position that prevents stress on connections. Orient the new unit so that the cold-water inlet and hot-water outlet align with the existing plumbing, reducing the need for excessive pipe adjustments. Confirm the tank is firmly supported and positioned for proper drainage, stable operation, and secure, leak-free connections before proceeding with system hookups.
Step 6: Install the temperature and pressure (T&P) relief valve and discharge pipe
After positioning the new water heater, install the temperature and pressure relief (T&P) valve into the factory-designated threaded port on the upper side of the water heater tank, typically marked specifically for T&P valve installation. Wrap Teflon tape around the valve threads, then tighten the valve securely with an adjustable wrench to create a leak-proof seal without over-tightening. Attach a discharge pipe to the valve outlet and direct it downward toward a suitable drainage point, maintaining a straight, unobstructed path. Ensure the pipe terminates safely near floor level and complies with local codes, allowing controlled release of hot water or steam to prevent tank damage or hazardous pressure buildup.
Step 7: Connect the cold water inlet and hot water outlet lines
Attach the cold-water inlet and hot-water outlet lines to the water heater tank using flexible connectors or approved pipe fittings, ensuring proper alignment with existing plumbing to prevent strain on the joints. Wrap Teflon tape around threaded connections, then tighten them with a pipe wrench to create secure, leak-resistant seals without over-tightening. Install shut-off valves if not already in place to allow control during maintenance. Verify the correct inlet and outlet orientation, then check all fittings for alignment and tightness to ensure smooth water flow, stable pressure, and a dependable, code-compliant system ready for operation.
Step 8: Connect the power supply (electric wiring or gas line)
Once the inlet and outlet lines are connected, establish the power or fuel connection by wiring the electric water heater or attaching the gas supply line, ensuring all connections meet the unit’s specifications and local code requirements. For electric systems, open the junction box, connect wires according to the breaker rating, secure terminals, and properly ground the unit to prevent electrical hazards. For gas units, connect the supply line to the control valve, tighten fittings with approved sealant, and test all joints for leaks. Verify stable power or gas flow before startup to ensure efficient heating and safe, reliable operation.
Step 9: Reattach the vent pipe (for gas water heaters)
With the power connected to the water heater, reattach the vent pipe by aligning it with the draft hood outlet and securing it firmly with screws to ensure a stable, sealed connection. Ensure the vent pipe maintains a proper upward slope toward the chimney or flue to support effective draft and prevent backflow of combustion gases. Check that all joints are tight, properly fitted, and free from gaps or obstructions that could restrict airflow. Confirm that the venting path is clear and well-supported, allowing the safe discharge of harmful gases such as carbon monoxide and maintaining a code-compliant, properly ventilated system.
Step 10: Fill the tank and purge air from the system
Open the cold water supply valve to fill the water heater tank, ensuring the unit is fully charged with water before activation. Keep a nearby hot-water tap open while filling to release trapped air and prevent pressure buildup in the system. Allow the tank to fill until water flows steadily from the open faucet without sputtering, indicating that all air has been purged. Once complete, close the tap and check the system for proper pressure and stable flow, ensuring the tank is filled and ready for safe startup without risking damage to the heating element or internal components.
Step 11: Check all connections for leaks (water and gas)
Inspect all water supply lines, pipe fittings, and gas connections for leaks to ensure every joint is properly sealed before activating the system. Turn on the water supply and check around the cold inlet, hot outlet, and all fittings for drips or moisture, tightening connections where needed. For gas systems, apply a leak-detection solution to the supply line and watch for bubbles indicating escaping gas. Recheck all joints after adjustments to confirm a secure seal, ensuring the installation remains leak-free, pressure-stable, and safe for operation without risk of water damage or gas hazards.
Step 12: Turn on the power or gas supply and start the unit
Restore power or fuel supply to the water heater by switching on the circuit breaker for an electric unit or opening the gas control valve for a gas unit, allowing the system to begin heating. Ensure the control settings are correctly configured, then verify the unit receives power or gas flow without interruption. Observe the startup process to confirm that the heating element or burner activates as expected and that no warning signs appear. Monitor the initial operation to ensure stable performance, confirming that all components function correctly and that the system transitions safely from installation to active, reliable use.
Step 13: Set the thermostat to a safe temperature (around 120°F/49°C)
Once the water heater is fully operational, set the thermostat to a safe temperature level to regulate heating and prevent overheating within the tank. Locate the thermostat control panel on the front or side of the unit, typically behind an access cover on electric models or near the gas control valve on gas units, and adjust it to around 120°F (49°C). Allow the system time to reach temperature, then check nearby fixtures to confirm steady hot-water output, ensuring efficient operation while reducing the risk of scalding, excessive pressure buildup, and unnecessary energy use.
Step 14: Perform final safety checks and ensure proper operation
Finally, perform final safety checks by inspecting all water heater components, verifying system performance, and confirming the unit operates correctly to ensure the installation is secure and fully functional. Inspect the tank, temperature and pressure relief valve, vent pipe, and all pipe fittings for proper alignment and tight connections, then run hot water through multiple outlets to test flow and heating consistency. Monitor the unit for steady operation, checking for unusual noises, pressure fluctuations, or leaks. Confirm that the system remains properly sealed, vented, and stable to ensure safe operation and reliable hot water delivery.
What Should You Consider Before Installing a Water Heater?

Before installing a water heater, assess the type and size to match household demand, evaluate the fuel type and energy efficiency, verify local codes, review the warranty and lifespan, and estimate the cost and maintenance requirements. These factors guide proper system selection, prevent safety or compliance issues, control long-term operating costs, and ensure consistent performance and reliability throughout the water heater’s service life.
- Type and Size of Water Heater
Matching the water heater’s tank capacity to household demand is essential because an undersized unit leaves residents without adequate hot water during peak hours, while an oversized one unnecessarily drives up energy bills and installation costs. Whether choosing a tankless, storage, or heat pump system, selecting the right size ensures consistent performance and prevents premature wear from overworking an undersized heater.
- Fuel Type and Energy Efficiency
The choice between electric, gas, or solar power shapes nearly every aspect of the water heater installation, from infrastructure requirements to monthly operating costs. A fuel type that aligns with the home’s existing supply avoids costly upgrades, and prioritizing energy-efficient models can deliver significant long-term savings on utility bills while reducing the system’s environmental footprint.
- Local Building Codes and Regulations
Every water heater installation must comply with local building and plumbing codes, and overlooking this step can have serious consequences. Non-compliant installations risk safety hazards such as gas leaks, carbon monoxide exposure, or water damage, and may require a costly full reinstallation to bring the system up to standard. Verifying permit requirements before work begins protects both the occupants and the investment.
- Warranty and Estimated Lifespan
Long-term reliability of the water heater depends heavily on the warranty coverage and the expected service life of the selected unit. A water heater backed by a strong warranty signals manufacturer confidence in the product and provides a financial safety net against early failures, while a longer lifespan means fewer replacement cycles and more predictable budgeting over time.
- Cost and Maintenance of Water Heater
Beyond the upfront installation cost, ongoing maintenance is what determines the true ownership value of a water heater. Routine tasks such as flushing sediment buildup, inspecting the anode rod, and checking pressure relief valves directly extend the water heater’s lifespan and preserve efficiency, turning a modest maintenance investment into years of added reliable service.
What Are the Essential Safety Tips for Installing a Water Heater?
Essential safety tips for water heater installation include turning off utilities, installing the temperature and pressure relief valve correctly, ensuring proper venting, inspecting for leaks, following electrical standards, securing the unit, and setting a safe thermostat temperature. These measures ensure the water heater installation remains code-compliant, leak-proof, and safe from hazards such as pressure buildup, gas leaks, or electrical faults.
8 safety tips for water heater installation are:
- Turn off all utilities before starting: Isolate water, gas, and electricity to prevent shocks, leaks, and uncontrolled flow during installation.
- Install the temperature & pressure relief (T&P) valve correctly: Ensures excess pressure and heat are safely released, preventing tank rupture and serious hazards.
- Use Proper Venting for Gas Water Heaters: Directs harmful combustion gases outside, protecting indoor air quality and occupant safety.
- Check for gas and water leaks after installation: Confirms all connections are sealed and prevents water damage, fire risk, or gas exposure.
- Follow correct electrical wiring standards: Provides stable power, avoids overload, and reduces the risk of electrical faults or fire.
- Secure the water heater firmly to prevent movement or tipping: Keeps the unit stable, protecting connections from stress, vibration, and potential leaks.
- Verify Compliance with Local Building Codes: Ensures safe installation, passes inspections, and avoids legal or costly corrections.
- Set the thermostat to a safe temperature (around 120°F/49°C): Reduces scalding risk, lowers energy use, and maintains efficient, consistent performance.
- Turn off all utilities before starting
Shutting off the water supply, gas line, or electrical wiring before any water heater installation work begins is the most fundamental safety step, as it isolates the system, prevents accidental activation, and creates a controlled environment for safe handling. Active utilities during installation create immediate risks, including electrical shock, gas leakage, and uncontrolled water flow.
- Install the temperature & pressure relief (T&P) valve correctly
A correctly installed temperature and pressure relief valve is the water heater tank’s primary safety mechanism, regulating excess pressure and temperature before they reach dangerous levels. Without it properly in place, the risk of tank rupture and high-temperature water discharge increases significantly.
- Use Proper Venting for Gas Water Heaters
Proper vent pipe and flue pipe connection is critical to the safe operation of a gas water heater, as combustion gases are an unavoidable byproduct of the heating process and require controlled exhaust flow. A well-ventilated exhaust system safely channels harmful gases, such as carbon monoxide, out of the living space, helping maintain healthy indoor air quality.
- Check for gas and water leaks after installation
Thoroughly inspecting every pipe fitting, gas line, and water supply connection once the water heater installation is complete is a vital final step, as it verifies leak-free joints, confirms proper pressure handling, and ensures the system operates safely from the start. Catching loose or poorly sealed joints early prevents water damage and eliminates the risk of fire and explosion from gas leaks.
- Follow correct electrical wiring standards
Connecting an electric water heater to a voltage-compatible, properly grounded circuit with the correct breaker is essential for safe and reliable operation, as it ensures stable power delivery, prevents circuit overload, and supports code-compliant installation. Correct wiring protects the heating element from damage and significantly reduces the risk of electrical faults or household fires.
- Secure the water heater firmly to prevent movement or tipping
Anchoring the water heater tank with seismic straps or mounting supports is a straightforward step that improves stability, prevents tipping during movement or seismic activity, and protects the unit from structural stress. Keeping the unit firmly in place protects pipe fittings and connections from the strain of movement and vibration, reducing the likelihood of leaks over time.
- Verify Compliance with Local Building Codes
Confirming that the water heater installation meets local codes and safety regulations ensures the system is built to recognized minimum standards, passes inspections, and avoids costly penalties or rework. Compliance covers critical areas such as placement, drainage, and approved venting methods, protecting both occupant safety and legal standing.
- Set the thermostat to a safe temperature (around 120°F/49°C)
Setting the water heater thermostat to around 120°F is a simple adjustment that improves safety, lowers energy consumption, extends equipment lifespan, and helps maintain stable, consistent hot water delivery. Keeping the temperature at this level reduces the risk of scalding, limits unnecessary pressure buildup, and supports energy-efficient operation.
What Tools and Materials Are Needed to Install a Water Heater?
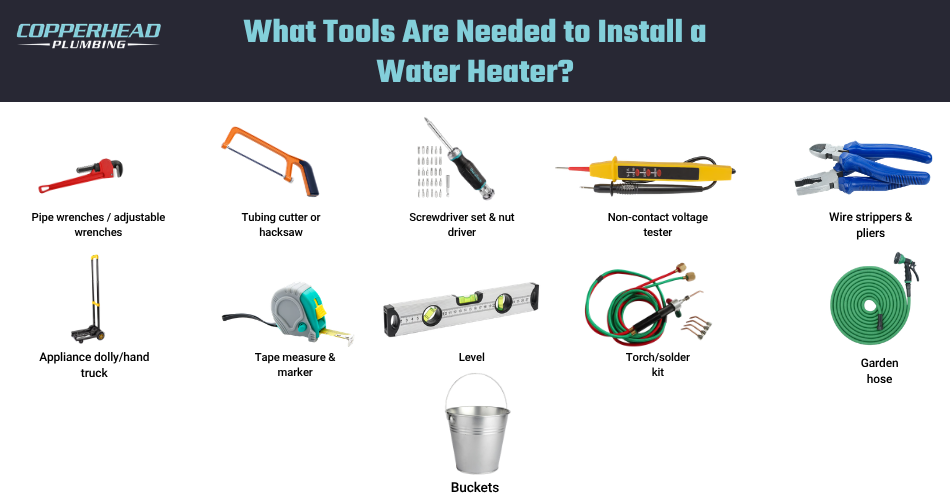
Installing a water heater requires tools like pipe wrenches, tubing cutters, and voltage testers, as well as materials such as flexible connectors, T&P valves, and Teflon tape to ensure a secure, leak-proof installation. Using the right plumbing tools and materials ensures precise connections, durable seals, proper pressure handling, and a code-compliant system that operates safely, efficiently, and reliably over time.
Tools
- Pipe wrenches / adjustable wrenches
- Tubing cutter or hacksaw
- Screwdriver set & nut driver
- Non-contact voltage tester
- Wire strippers & pliers
- Appliance dolly/hand truck
- Tape measure & marker
- Level
- Torch/solder kit
- Garden hose
- Buckets
Materials
- New water heater (electric or gas)
- Flexible connector kit
- T&P valve with discharge pipe
- Pipe thread sealant (Teflon tape or pipe dope)
- Water heater drain pan
- Shutoff valve
- Thermal expansion tank
How to Install a Storage Tank Water Heater?
Installing a storage-tank water heater involves placing the tank on a drain pan, connecting the cold-water inlet and hot-water outlet, installing the temperature-and-pressure relief valve, connecting power or gas, and filling and testing the tank for proper operation. This process ensures that the storage-tank water heater installation maintains a consistent hot-water supply, manages pressure safely, and operates in a code-compliant, leak-proof setup.
- Position the storage tank water heater on a level surface and place it in a drain pan to catch leaks or overflow.
- Install the T&P valve on the tank port and attach a discharge pipe to a safe drainage point.
- Connect the cold-water inlet and hot-water outlet to the home plumbing using appropriate fittings.
- Install a shut-off valve on the cold inlet and add an expansion tank to manage pressure changes.
- Seal threaded connections with Teflon tape and tighten fittings to ensure leak-free joints.
- Connect the gas line with a control valve or wire the unit to a dedicated circuit with proper grounding.
- Open the cold-water supply, fill the tank, and purge air through a hot-water faucet.
- Inspect all connections and test the unit to confirm proper heating, pressure, and operation.
How to Install an Electric Hot Water Heater?
To install an electric hot water heater, position the unit, connect the cold water supply and hot water outlet, wire the electrical connections to the circuit breaker, and fill and test the system. This process ensures electric hot water heater installation is completed with properly grounded wiring, a stable power supply, consistent hot water delivery, and a voltage-compatible, leak-proof water connection system.
- Position the electric water heater on a level surface and place it in a drain pan to protect against leaks or condensation.
- Install the T&P valve on the tank port and attach a downward discharge pipe to a safe drain point.
- Connect the cold inlet to the hot outlet using flexible connectors, and tighten all fittings securely.
- Seal threaded connections with Teflon tape to ensure leak-free water lines.
- Route wiring into the junction box and connect hot, neutral, and ground wires to the correct terminals.
- Connect to a dedicated circuit breaker sized to the unit and confirm proper grounding.
- Open the cold-water supply, fill the tank, and purge air through a hot-water faucet.
- Inspect all connections and test the unit to confirm safe operation and proper heating.
How to Install a Tankless Water Heater?
Installing a tankless water heater involves mounting the unit, connecting the cold water supply and hot water outlet, attaching the gas line or electrical wiring, installing proper venting, and testing the system for performance. This process ensures tankless water heater installation delivers efficient on-demand hot water with proper venting, stable energy use, and a code-compliant, reliable system.
- Mount the tankless water heater securely on a solid wall near the main water and energy source using approved brackets.
- Install isolation valves on the cold inlet and hot outlet, along with flush valves for easy maintenance access.
- Connect the cold-water inlet and hot-water outlet using rated flexible connectors, and tighten the fittings to prevent leaks.
- Seal threaded connections with Teflon tape to maintain a leak-proof flow through the unit.
- Connect the gas line to the unit’s valve or wire the electric model to a dedicated high-amperage circuit.
- Install the vent pipe for gas units using approved materials, ensuring a sealed path to the exterior.
- Open the water supply slowly and purge air through a hot water outlet before startup.
- Inspect all connections and test the system under load to confirm safe, consistent operation.
How to Install a Hybrid Water Heater?
Installing a hybrid water heater involves positioning the unit, connecting the water supply lines, setting up electrical wiring, ensuring proper airflow for the heat pump system, and testing the unit for operation. This process ensures that a hybrid water heater installation delivers energy-efficient performance by combining heat pump technology with storage-tank functionality in a properly installed and balanced system.
- Position the hybrid water heater in a well-ventilated indoor space with at least 1,000 cubic feet of air for efficient heat pump operation.
- Place the unit on a drain pan and ensure the surface is level and strong enough to support its weight.
- Install the T&P valve on the tank port and attach a downward discharge pipe to a proper drain.
- Connect the cold-water inlet and hot-water outlet using compatible flexible connectors, and tighten the fittings securely.
- Seal threaded connections with Teflon tape to maintain a leak-proof water flow path.
- Install a thermal expansion tank on the cold water side to manage pressure changes during heating cycles.
- Wire the unit to a dedicated 240-volt breaker and ensure proper grounding for safe operation.
- Maintain recommended clearance around the unit to allow proper airflow for the heat pump.
- Fill the tank, purge air through the hot-water outlet, and check all connections for leaks.
- Test both heat pump and electric modes to confirm proper performance and efficiency.
How to Install a Solar Water Heater?
Installing a solar water heater involves positioning the solar collectors, installing the storage tank, connecting the cold-water supply and hot-water outlet, integrating the circulation system, and testing the setup. This process ensures solar water heater installation captures and transfers solar energy efficiently, delivering hot water through a properly installed, energy-efficient, and well-integrated system.
- Install solar collectors on a south-facing roof at an angle close to local latitude for maximum solar exposure.
- Position the storage tank near existing plumbing on a stable, level surface capable of supporting its full weight.
- Connect the cold-water inlet to the system, and route the hot-water outlet through the tank to the home lines.
- Install insulated pipes between rooftop collectors and the storage tank to reduce heat loss and maintain efficiency.
- Set up the circulation system with a pump and a controller to regulate fluid flow between collectors and the tank.
- Add a backup electric or gas heating element to maintain hot water during low sunlight or high demand.
- Seal pipe fittings with Teflon tape and weatherproof roof penetrations to prevent leaks
- Fill the system with heat transfer fluid, purge air, and ensure smooth circulation through the loop.
- Check for leaks and test the solar water heater system to confirm proper heating and operation.
How to Maintain Your Water Heater After Installation?
Maintaining your water heater includes regular flushing, component inspection, leak checks, and timely part replacement to keep the system performing reliably over its full lifespan. Consistent upkeep ensures the water heater remains energy-efficient, sediment-free, and operates safely without risking water damage, pressure buildup, or premature system failure.
7 maintenance tips to follow after water heater installation are:
- Flush the water heater tank regularly
- Inspect the temperature and pressure relief valve
- Check for water leaks in connections
- Replace the anode rod periodically
- Inspect electrical wiring or gas connections
- Adjust thermostat settings if needed
- Keep the area around the unit clean and obstructions-free
- Flush the water heater tank regularly
Draining the water heater tank annually starts with connecting a garden hose to the drain valve and allowing it to empty until the water runs clear. Skipping this step allows sediment and mineral deposits to accumulate, insulating the heating element and reducing efficiency. Regular flushing restores the tank’s full heating capacity and extends its working life.
- Inspect the temperature and pressure relief valve.
Testing the T&P valve requires lifting the valve lever briefly and confirming that water discharges freely and that the valve reseats cleanly once released. This valve is the water heater’s primary defense against dangerous pressure and temperature spikes inside the tank. Any valve that sticks or fails to reseat must be replaced promptly to maintain safe operation.
- Check for water leaks in connections
A thorough leak check involves examining the water heater’s supply line, pipe fittings, drain valve, and T&P discharge pipe for moisture, corrosion, or mineral staining. Tightening loose fittings and replacing corroded components early prevents minor seepage from escalating into costly water damage. Routine inspections preserve system integrity and protect the installation area from moisture exposure.
- Replace the anode rod periodically
Replacing the anode rod begins with shutting off the water supply, locating the rod at the top of the tank, and unscrewing it for inspection. Once depleted, this sacrificial component leaves the tank lining exposed to accelerating rust and deterioration. A rod worn to less than half an inch of core wire should be replaced immediately to prevent premature tank failure.
- Inspect electrical wiring or gas connections
Checking the water heater’s electrical connections involves confirming that the junction box wiring is secure and the circuit breaker connection is properly grounded. For gas water heaters, applying soapy water to gas supply line fittings reveals developing leaks through visible bubbling, which requires immediate professional attention. Keeping these connections sound eliminates the risk of electrical faults or gas-related hazards.
- Adjust thermostat settings if needed
Locating the temperature control dial and verifying it holds steady at the recommended 120°F is a simple check that directly impacts both safety and efficiency. A thermostat set higher than recommended increases energy consumption, accelerates pressure buildup, and raises the risk of scalding. Recalibrating when output feels inconsistent restores stable, efficient water heater performance.
- Keep the area around the unit clean and obstructions-free
Regularly clearing stored items, dust, and debris around the water heater ensures the unit remains properly ventilated and fully accessible. Blocked vents on gas water heaters restrict exhaust flow and increase the risk of carbon monoxide, while obstructed heat pump intakes reduce hybrid unit efficiency. Maintaining clear clearance around the unit supports safe airflow and quick access during servicing or emergency shutoff.
What Are the Common Problems That Can Occur During Water Heater Installation?

Common problems during water heater installation include improper connections, leaks, incorrect wiring or gas setup, poor venting, and non-compliance with local codes. These issues can lead to water damage, inefficient heating, safety hazards, and reduced lifespan of the water heater system.
9 common problems that can occur while installing a water heater are:
- Improperly connected water supply lines
- Leaks from pipe fittings or valves
- Incorrect electrical wiring or grounding
- Gas leaks from an improper gas line connection
- Improper venting in gas water heaters
- Failure to install or correctly place the pressure relief valve
- Sediment buildup due to improper flushing
- Non-compliance with local plumbing codes
- Improper leveling or unstable installation
- Improperly connected water supply lines:
Misaligned or insufficiently tightened cold water supply lines and hot water outlets disrupt water flow and create leak points at the connection joints. Verifying alignment and applying the correct torque to all fittings during installation prevents an inconsistent hot water supply and protects against moisture damage around the unit.
- Leaks from pipe fittings or valves:
Leaks develop at threaded pipe fittings and valve connections when Teflon tape is applied incorrectly or when fittings are not tightened to a proper seal. Inspecting every joint after installation and resealing any exposed threads eliminates the seepage that leads to water damage and reduced water heater efficiency over time.
- Incorrect electrical wiring or grounding
An electric water heater wired to an incompatible voltage or lacking proper grounding risks heating-element failure and poses serious electrical hazards. Confirming that wiring matches the unit’s voltage requirements and that all connections are grounded to a dedicated circuit breaker ensures safe and reliable operation.
- Gas leaks from an improper gas line connection
A gas supply line that is not securely fastened to the gas control valve poses an immediate risk of fire and explosion, even with a small leak. Applying soapy water to all gas fittings after connection and watching for bubbling confirms a gas-safe seal before the water heater is commissioned.
- Improper venting in gas water heaters
A poorly fitted vent pipe or flue pipe traps combustion exhaust inside the living space, creating dangerous carbon monoxide buildup and degrading indoor air quality. Ensuring that all vent connections are correctly joined, sealed, and directed to a clear exterior exhaust point is essential for safe operation of a gas water heater.
- Failure to install or correctly place the pressure relief valve
A missing or improperly positioned T&P valve leaves the water heater tank without a mechanism to release dangerous pressure and temperature spikes. Installing the valve on the designated tank port with a properly directed discharge pipe is a non-negotiable safety requirement that prevents tank damage or catastrophic failure.
- Sediment buildup due to improper flushing
Failing to flush the water heater tank before or after installation allows accumulated sediment to settle around the heating element, reducing efficiency and causing uneven heating. Performing a full flush through the drain valve until the water runs clear removes this buildup and establishes a clean baseline for long-term tank performance.
- Non-compliance with local plumbing codes
An installation that does not meet local building and plumbing code requirements fails to satisfy minimum safety standards for placement, venting, and drainage. Verifying permit requirements and code specifications before beginning work avoids the cost and disruption of reinstallation and protects against legal penalties.
- Improper leveling or unstable installation
A water heater tank that is not level or securely anchored places uneven stress on internal components and pipe fittings, accelerating wear and increasing the likelihood of leaks. Confirming a level mounting surface and securing the unit with appropriate supports or seismic straps during installation prevents long-term structural and connection issues.
What Are the Common Mistakes to Avoid When Installing a Water Heater?
Common mistakes to avoid during water heater installation include incorrect sizing, poor sealing of connections, improper wiring or gas setup, inadequate venting, and ignoring local codes. These mistakes can lead to water leaks, safety hazards, inefficient heating, and reduced lifespan of the water heater system.
Below are the 10 common mistakes that you should avoid during water heater installation:
- Choosing the wrong size water heater
- Improper sealing of the pipe fitting
- Incorrect connection of water supply lines
- Faulty electrical wiring or a lack of grounding
- Improper gas line installation
- Ignoring proper venting requirements
- Skipping the installation of the temperature and pressure relief valve
- Not installing a drain pan or expansion tank
- Failing to level and secure the water heater
- Ignoring local plumbing codes and safety standards
- Choosing the wrong size water heater
Selecting a water heater tank without assessing household hot-water demand results in either an undersized unit that cannot meet peak demand or an oversized unit that wastes energy. Calculating the correct first-hour rating and tank capacity before purchase ensures consistent hot water availability and efficient system performance.
- Improper sealing of the pipe fitting
Water heater pipe connections that are installed without Teflon tape or pipe dope remain vulnerable to seepage, even when hand-tightened to what feels like a secure fit. Applying sealant to every threaded joint and verifying each connection after pressurizing the system prevents water damage and ensures a leak-proof installation.
- Incorrect connection of water supply lines
Reversing the cold-water inlet and hot-water outlet on the water heater during installation disrupts the system’s entire flow path, preventing the unit from functioning as intended. Verifying labeled inlet and outlet ports before making connections ensures correct water flow and heating efficiency from the start.
- Faulty electrical wiring or a lack of grounding
Connecting an electric water heater to an incompatible circuit or failing to ground the unit properly creates electrical hazards that can damage the heating element and increase the risk of fire. Matching the wiring to the water heater’s voltage requirements and securing a properly grounded, dedicated circuit ensures safe, uninterrupted electrical operation.
- Improper gas line installation
A gas water heater supply line that is loosely fitted or inadequately sealed at the gas control valve allows gas to escape, creating an immediate fire and explosion hazard. Tightening all gas fittings to the correct specification and testing every joint with soapy water before commissioning the unit confirms a fully gas-safe connection.
- Ignoring proper venting requirements
Installing a vent pipe or flue pipe incorrectly on a gas water heater prevents combustion exhaust from exiting safely, allowing harmful gases, including carbon monoxide, to accumulate indoors. Following the manufacturer’s venting specifications and confirming a clear, unobstructed exhaust path to the exterior protects indoor air quality and overall system safety.
- Skipping the installation of the temperature and pressure relief valve
Omitting the T&P valve during water heater installation leaves the tank without a means to release dangerous pressure and temperature buildup during operation. Installing this valve on the designated tank port with a correctly directed discharge pipe is a fundamental safety requirement that prevents tank stress and catastrophic failure.
- Not installing a drain pan or expansion tank
Leaving out a drain pan during water heater installation eliminates the only barrier between a leaking unit and costly floor or structural damage, while omitting a thermal expansion tank allows pressure fluctuations to stress the entire plumbing system. Installing both components during initial setup protects the surrounding area and maintains stable pressure throughout the water heater’s operating life.
- Failing to level and secure the water heater
A water heater tank installed on an uneven surface or without proper anchoring places continuous stress on pipe fittings and internal components, gradually loosening connections and accelerating wear. Confirming a level mounting surface and securing the unit with appropriate supports or seismic straps prevents long-term structural instability and reduces the risk of leaks.
- Ignoring local plumbing codes and safety standards
Proceeding with water heater installation without verifying local building and plumbing code requirements risks a non-compliant setup that fails to meet minimum safety standards for venting, placement, and drainage. Confirming permit requirements and code specifications before beginning work avoids the expense of forced reinstallation and protects against legal penalties.
How Long Does It Take to Install a Water Heater?
Water heater installation takes 2 to 4 hours, depending on the type of water heater, the complexity of the installation process, and the condition of existing water supply lines, electrical wiring, or gas connections. A straightforward storage tank replacement with compatible existing infrastructure sits at the lower end of this range, while first-time installations requiring new pipe runs, venting modifications, or electrical panel work can extend the process considerably. Additional time is also needed when code compliance updates, permit inspections, or structural adjustments to the mounting area are required before the unit can be safely commissioned.
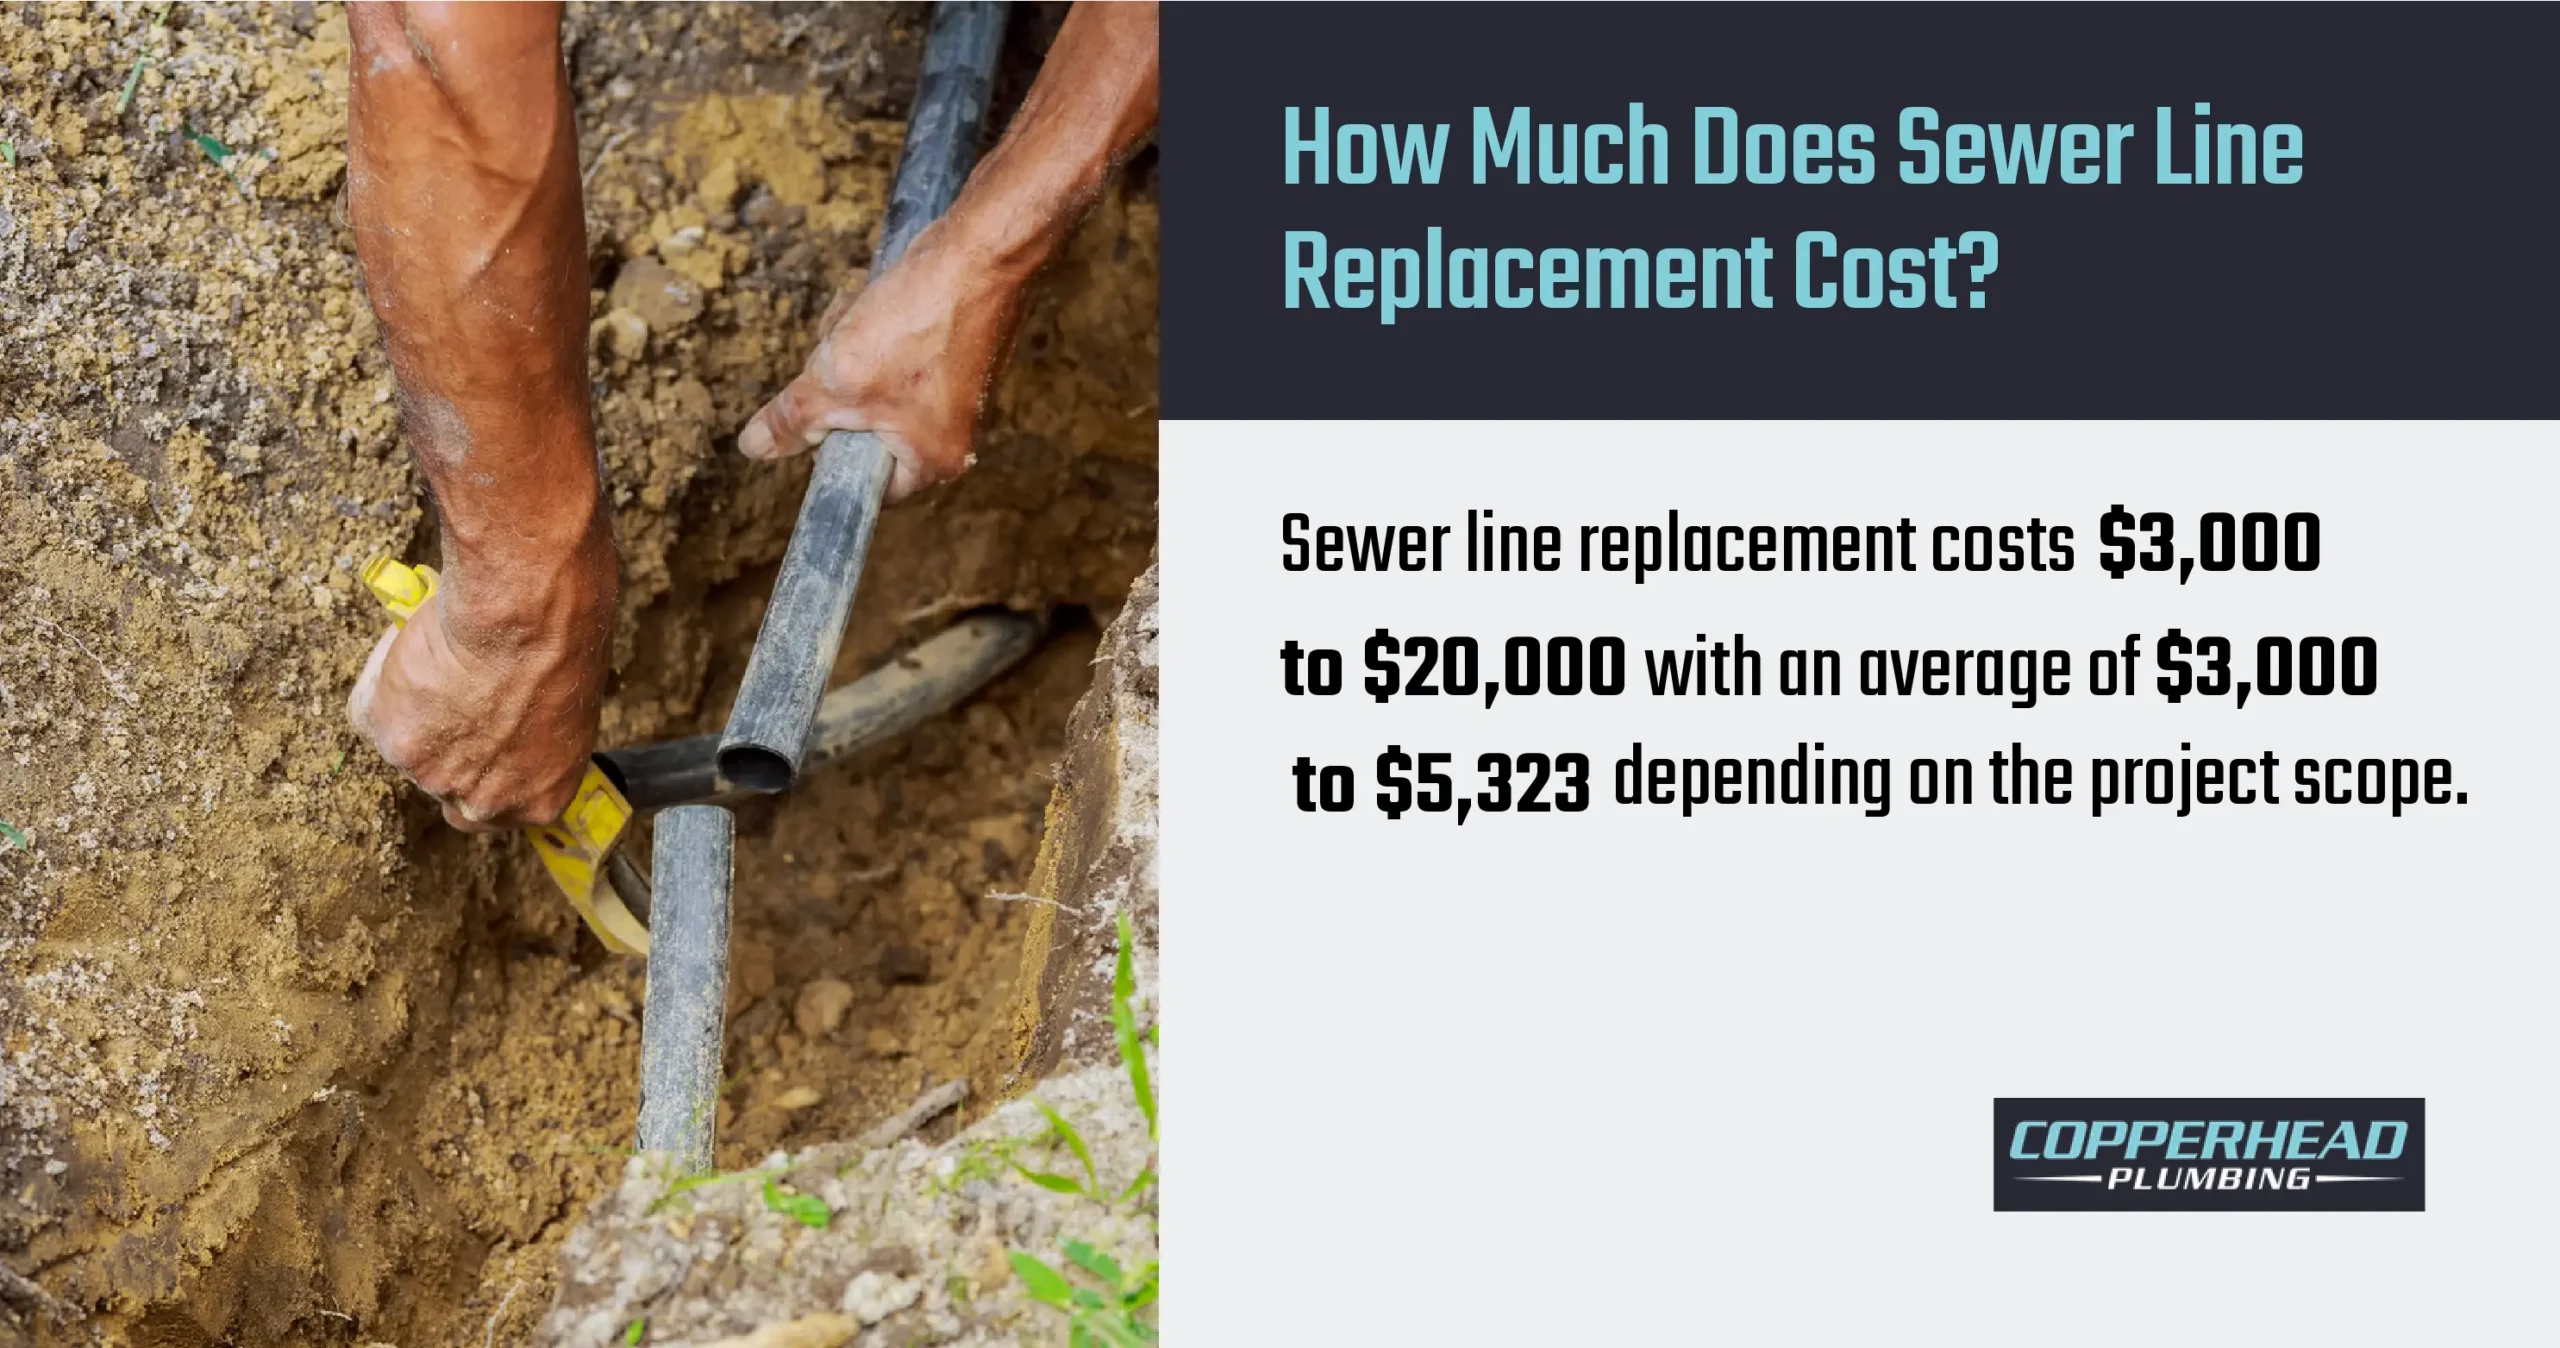
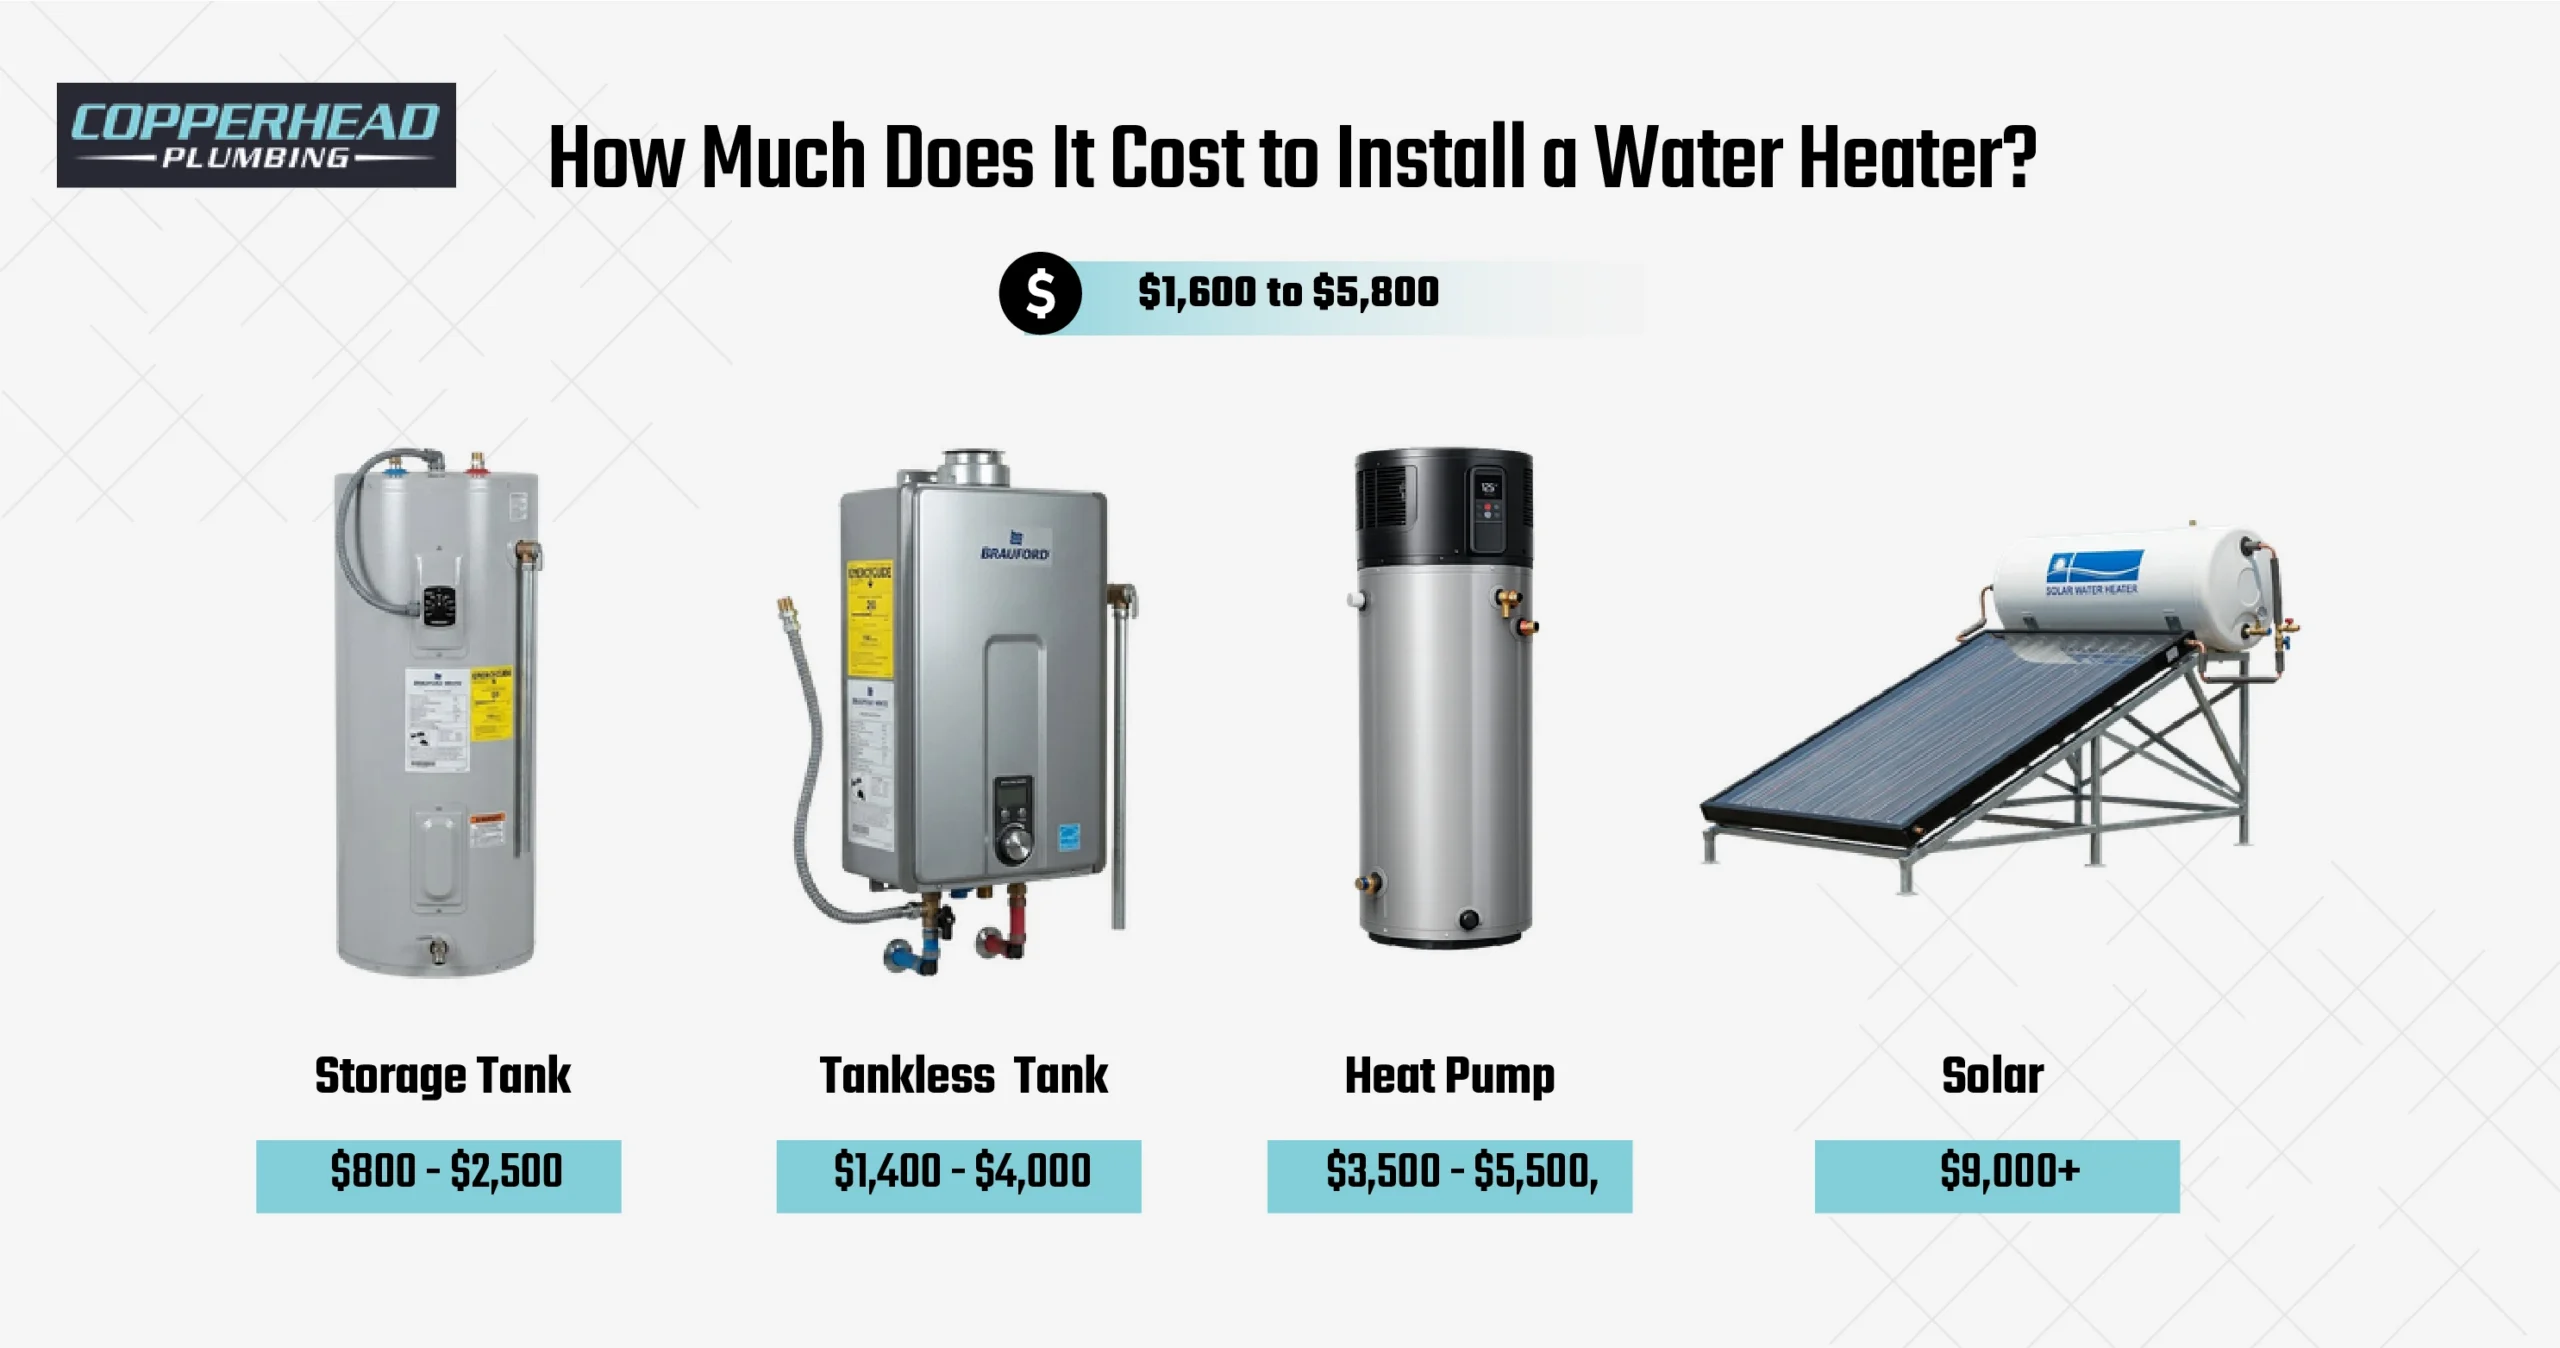
How Much Does It Cost to Install a Water Heater?
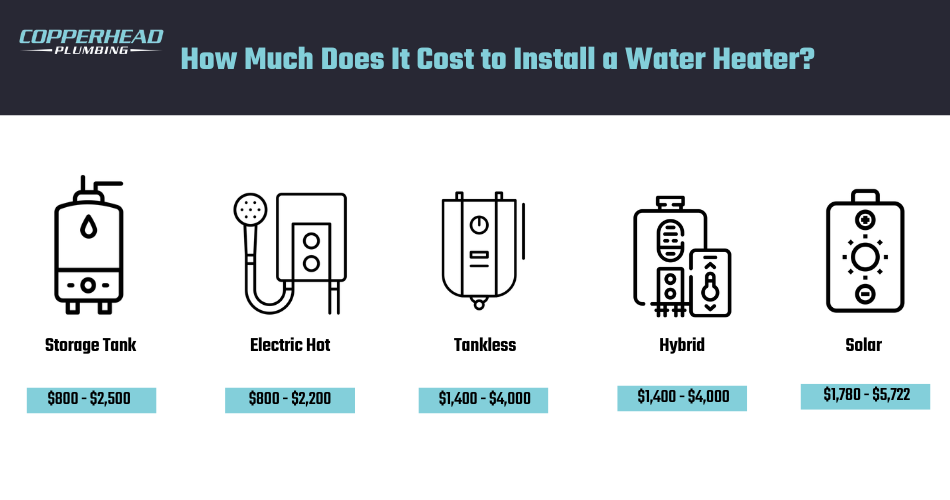
Installing a new water heater costs between $1,600 and $5,800, depending on the type of unit, labor complexity, and any required modifications to water supply lines, electrical wiring, or gas connections. Storage tank units typically fall at the lower end of this range, while tankless, hybrid, and solar installations command higher costs due to specialized components and more involved setup requirements. Additional expenses, such as permit fees, expansion tanks, venting upgrades, and code-compliance modifications, can further affect the final water heater installation cost.
- How Much Does It Cost to Install a Storage Tank Water Heater?
The cost of installing a storage tank water heater ranges from $800 to $2,500, depending on tank size, labor complexity, and the condition of existing plumbing and connections. Costs may increase if upgrades, additional components, or code-compliance work are required.
- How Much Does It Cost to Install an Electric Hot Water Heater?
Installing an electric hot water heater costs between $800 and $2,200, depending on unit size, electrical wiring requirements, and labor complexity. The total cost varies based on factors such as circuit breaker upgrades, properly grounded electrical wiring, installation site conditions, and any additional components required for a code-compliant, voltage-compatible setup.
- How Much Does It Cost to Install a Tankless Water Heater?
Tankless water heater installation costs between $1,400 and $4,000, depending on system type, fuel source, and installation complexity. The total cost increases if upgrades such as high-capacity electrical wiring, gas supply line modifications, or proper venting systems are required to ensure an energy-efficient and code-compliant tankless water heater installation.
- How Much Does It Cost to Install a Hybrid Water Heater?
The cost of installing a hybrid water heater ranges between $3,500 and $5,500, depending on tank capacity, heat pump configuration, and electrical installation requirements. The total cost increases based on factors such as ventilation needs, installation site conditions, and the need for properly grounded electrical wiring to maintain an energy-efficient, code-compliant hybrid water heater system.
- How Much Does It Cost to Install a Solar Water Heater?
Solar water heater installation costs between $1,780 to $5,722, depending on system size, type of solar collectors, and installation complexity. The total cost varies based on factors such as roof-mounting requirements, insulated piping, circulation-system components, and integration with backup heating, to ensure an energy-efficient, properly installed solar water heater system.
Should You Install a Water Heater Yourself or Hire a Professional?
You can install a water heater yourself for simple replacements that use existing connections, whereas hiring a professional plumber is necessary for complex water heater installation involving gas lines, electrical wiring, or code compliance. The decision between DIY and hiring a professional water heater installer depends on the installation complexity, safety requirements, and your ability to ensure a properly installed, code-compliant water heater system.
Install a Water Heater Yourself (DIY) When:
- The replacement water heater matches the existing unit type with compatible supply lines and outlet connections already in place.
- Existing electrical wiring is voltage-compatible, properly grounded, and requires no circuit breaker upgrades.
- The installation requires no gas line modifications, vent pipe rerouting, or new component additions.
- The installation site is accessible, level, and ready to support the new unit without structural adjustments.
Hire a Professional Water Heater Installer When:
- Gas water heater installation requires professionally attaching, sealing, and pressure-testing the gas supply line to eliminate the risk of leaks.
- The installation involves new vent pipe routing, flue pipe connection, or exhaust ventilation that must meet safety specifications.
- Electrical work may require rewiring, grounding upgrades, or installation of a new dedicated circuit breaker for the unit.
- Local building codes require permits, professional inspections, or compliance documentation before the installation can be approved.
Which Is Better: Replacing a Water Heater or Installing a New One?
Replacing a water heater is better when upgrading or swapping an existing unit with minimal changes, while installing a new one is ideal for new setups or major system upgrades. The most cost-effective approach is to replace a water heater when the existing supply lines, venting, and connections are compatible with the new unit, thereby eliminating the need for costly infrastructure changes. The right choice ultimately depends on your current plumbing layout, installation site readiness, and whether modifications are needed to meet safety standards and local codes.
When Replacing a Water Heater Is the Better Option:
- The existing water supply line, venting, and electrical or gas connections are compatible with the new unit.
- Upgrading to a more energy-efficient model with similar specifications and tank capacity.
- The installation site, drain pan, and mounting surface are already properly configured.
- Only minor updates are needed, such as new pipe fittings, a shutoff valve, or a pressure relief valve.
When Installing a New Water Heater Is the Better Option:
- Setting up a water heater system in a new home or relocating the unit to a different installation site.
- Switching unit types, such as from a storage tank to a tankless or from gas to electric.
- Significant infrastructure changes are required, such as new venting, upgraded electrical wiring, or an expansion tank.
- The current setup does not meet local plumbing codes, safety standards, or energy-efficiency requirements.